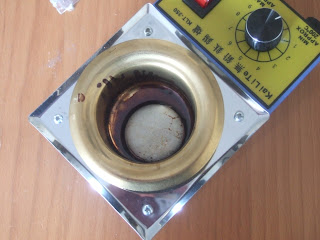
Anyway, the solder pot arrived and no sooner had I cut my finger on the sharp exposed edges around the pot than I had it up and running (careful of these cheaply-manufactured electronic tools - reminiscent of those nastily made PC cases that flooded the market in the early 90s, some of those edges can be razor sharp!). The moulded Australian style plug had to be cut off and a UK style plug fitted, but it didn't take long for the sharp tang of a new heater coil to fill the air.
(picture taken after solder has cooled, to show the rosin tarring inside the pot)
First, cut some multicore wire to length and strip back to expose the ends.
(we use quarter-pitch IDE cable - the sort of stuff you find in "round" IDE cables)
Dip the exposed copper into the solder, leave for a second or two, then remove.
The ends are perfectly tinned with just the right amount of solder.
Place the cable onto the tiny-pitch PCB connectors and heat with the tip of a soldering iron. Easy peasy - every wire connected first time, with no bridges or lumps of solder like we usually get when trying to solder these by hand.
We're still having to connect each wire one-at-a-time, but it's relatively easy. Ideally we'd like to get a really wide (15mm) chisel tip on the iron, so all wires can be connected in one go. But so far, the solder pot looks like it's going to be a useful addition to our arsenal of tools!


No comments:
Post a Comment