
Monday, October 10, 2011
Robotics in 30 years

Saturday, October 8, 2011
Robot Week Wales Wrexham
It's been a busy couple of weeks and while we've not managed to get much further on the multitude of projects we seem to be working on, we have been involved in some exciting developments.


The first thing is being involved with setting up HackLlan, a new hackspace for Llangollen and North Wales. At the minute it's a small community with a small space, but after less than a week, numbers are already increasing, and just as importantly, so is the interest in the group.

We're also looking to get involved with Robot Week Wales which is a week-long celebration of robotics, based at Techniquest in Wrexham's Glyndwr University.

And as part of the build-up to the Robot Week, we're looking to put on a show-and-tell session with other members of HackLlan, to show new potential members the kinds of things they can make at their local hackspace. This will be followed up with a more formal robot-building workshop, where attendees can make their own line-following robot.

So while all this is going on, our recent x-y plotter/cnc pick-n-place machine looks like it's going on hold. But we're determined to soldier on with our miniature instruments developement. The software is almost finished now (we've been working on it over recent weeks, while the internet connection here has been a bit intermittent) so we just need to get our guitars finished and tested and we're ready to launch a new website (details to be posted here nearer the time)
Friday, October 7, 2011
CNC.... A Real Learning Process
Over the past two days I have been working with my CNC machine trying to get to know how to make it work properly. First on the list was getting the table level with the "Z" axis so that when I want to engrave a piece that it is a constant depth throughout the entire part. I had to level the upper rails for the "X" axis so that at every corner of the table the cutting bit when touched to the part would read "Zero" on the Mach3 milling software that runs your part you want to make. I had to figure out how far out the table was in the first place and it did not look good. I started with the lower left front of the table and set my cutting bit to zero at this point. Then I checked the lower right corner. This was 3/16 of an inch lower. So was the upper two corners. In order to correct this I had to make some washer shims that I could slide under the mount for the "X" axis. This axis runs from the front to the back of the machine. The "Y" axis runs from side to side and the "Z" axis is the vertical axis the moves the cutting bit up and down. After about an hour or so of work and a couple of days of thinking about it I managed to get the table leveled to less than 1/64th of an inch on each corner. I was smiling at this point. Now I could do engravings and it would look great.
The next problem I encountered over the last two days was a problem that cropped up while trying to cut a simple little wooden box for my micrometer. I tried to cut this two part box in foam luckily as after five bad tries I was ready to pull my hair out of my head with frustration. What was happening was that the "Z" axis started to loose it's zero calibration that you set up before you start cutting a part. This calibration tells the machine that all measurements come off of the top surface of the part. The problem that cropped up was that the zero calibration started to change during the cutting of the part. In other words instead of cutting a 1/4 inch cut into the part the machine now would cut almost 1/2 inch deep cut. This made for bad parts every time. Luckily the parts were test cut in styrofoam instead of wood. Would have been a very expensive couple of days. After doing some research online I finally think I have the problem solved. I had made adjustments to the speed at which the machine cuts on all axis. I wanted the fastest possible speed without bogging the stepper motors down. Good idea but not for the "Z" axis. This axis as I said earlier moves the bit up and down into your part. But with too much speed the machine looses calibration and the cutting depth starts getting deeper and deeper somewhere in your part. I slowed the axis speed down and now it looks to be cutting correctly. One of the test pieces that had failed earlier today came out beautifully this afternoon. My sanity has been restored! Stay tuned for the final word and photos of the next finished part from the CNC machine and my workshop.
The next problem I encountered over the last two days was a problem that cropped up while trying to cut a simple little wooden box for my micrometer. I tried to cut this two part box in foam luckily as after five bad tries I was ready to pull my hair out of my head with frustration. What was happening was that the "Z" axis started to loose it's zero calibration that you set up before you start cutting a part. This calibration tells the machine that all measurements come off of the top surface of the part. The problem that cropped up was that the zero calibration started to change during the cutting of the part. In other words instead of cutting a 1/4 inch cut into the part the machine now would cut almost 1/2 inch deep cut. This made for bad parts every time. Luckily the parts were test cut in styrofoam instead of wood. Would have been a very expensive couple of days. After doing some research online I finally think I have the problem solved. I had made adjustments to the speed at which the machine cuts on all axis. I wanted the fastest possible speed without bogging the stepper motors down. Good idea but not for the "Z" axis. This axis as I said earlier moves the bit up and down into your part. But with too much speed the machine looses calibration and the cutting depth starts getting deeper and deeper somewhere in your part. I slowed the axis speed down and now it looks to be cutting correctly. One of the test pieces that had failed earlier today came out beautifully this afternoon. My sanity has been restored! Stay tuned for the final word and photos of the next finished part from the CNC machine and my workshop.
Thursday, October 6, 2011
What is BEAM Robotics
Maybe some of you have already heard about BEAM Robotics. For those who don't know exactly what a BEAM robot is I'll explain it to you in this post.
BEAM stands for:B-iologyE-lectronicsA-estheticsM-echanics
Common robots use a programmable microcontroller, which means some kind of computer, to make decisions. The more complex the behaviour of the robot the more complex the program in the microcontroller. Anyone who has already had some experience programming a robot can acknowledge this. With every new task the robot has to perform the complexity of the robot rises exponentially. It gets harder and harder to find and fix errors and to make the robot respond properly to its environment. Most developers would simply put much more effort into the "brain" of a robot to accomplish their goal. But the principle of BEAM offers another solution: Make the robot simpler by removing the microcontroller and use minimalist electronics instead. The results are much cheaper robots that can perform the same task even more efficiently than the microcontroller based ones. Another advantage of BEAM robots are that anyone can build one without even spending (much) money. The parts are easily available by reusing old components out of technoscrap. If you want to build a robot with a very simple behaviour "the common way" you'd probably spend about 50$ to 100$. If build a BEAM bot you might simply be able to do it for free. So if you want to know more about BEAM Robotics the following sites offer excellent information:"http://www.solarbotics.net/"Solarbotics"http://www.beam-wiki.org/">BEAM Wiki. Special thanks to BEAM Robotik for writing the post and his website is http://beam-robotik.blogspot.com/ !
Wednesday, October 5, 2011
Lego NXT goes solar
If you like lego and robotics then chances are you've heard of the Lego Mindstorms robotics kit. Well, not to long ago Lego unveiled its new Lego Solar kit. This kit includes an NXT programmable brick, servos, and a solar panel that is compatible with the programmable brick. This kit will allow kids to create automated machines that can harness the power of the sun. To me this sounds pretty cool, and if you like being green then this kit is perfect for you. Thanks for reading and check out the video above to see the introduction of the Lego Solar kit!
Tuesday, October 4, 2011
My Hamilton Technical College Lectures
I had a big day yesterday giving a series of five lectures to the students at Hamilton Technical College in Davenport Iowa. I was asked by Gene Brack one of the faculty members if I would give the lectures to help kick off a new program called the Student Creative Initiative that the school is just starting. I agreed to do the lectures and so my day was filled with informing close to 200 students during the day of what I have been working on over the years and what projects I am currently working on and some ideas for future projects.
The students will have the opportunity to submit their ideas to the faculty for a project that they may have been thinking about doing but simply could not start because of lack of tools, guidance or money. If the project they want to create is approved it will be funded by the school and the students have until next March to complete their projects. Hamilton Tech is heavy into electronics but the students were told that their projects need not be only about electronics but must include this aspect of their schooling. I was asked to do the lectures to hopefully inspire the students in to thinking about different things that they could create and how the creation process takes place. At least how it takes place with me anyway.
It was a busy day for me and I was asked a lot of good questions concerning the projects that I have designed and built and also some great ideas about future projects. Hopefully I managed to spark a few ideas in the minds of the students with the slide presentation that I showed them and the smaller projects that I could pass around the room during the lecture. As you can tell by my blog here I enjoy doing what I am doing and hopefully a little of that enthusiasm has rubbed off me and on to the students that I spoke to. I wish them good luck with their ideas and hopefully something great will come out of the program.
a
The students will have the opportunity to submit their ideas to the faculty for a project that they may have been thinking about doing but simply could not start because of lack of tools, guidance or money. If the project they want to create is approved it will be funded by the school and the students have until next March to complete their projects. Hamilton Tech is heavy into electronics but the students were told that their projects need not be only about electronics but must include this aspect of their schooling. I was asked to do the lectures to hopefully inspire the students in to thinking about different things that they could create and how the creation process takes place. At least how it takes place with me anyway.
It was a busy day for me and I was asked a lot of good questions concerning the projects that I have designed and built and also some great ideas about future projects. Hopefully I managed to spark a few ideas in the minds of the students with the slide presentation that I showed them and the smaller projects that I could pass around the room during the lecture. As you can tell by my blog here I enjoy doing what I am doing and hopefully a little of that enthusiasm has rubbed off me and on to the students that I spoke to. I wish them good luck with their ideas and hopefully something great will come out of the program.
a
Saturday, October 1, 2011
What Every Kitchen Needs..... Emergency Ketchup
Here's my first completed project that I put together with the help of my new CNC machine. I had come across a very small bottle of ketchup in my travels and saved the full bottle for just such a project.

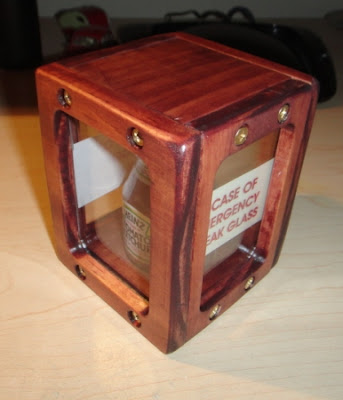


I encased the little bottle in a display case for my kitchen.

The case is 3 1/4 inches square and 4 inches tall. Made of aspen wood and stained in red oak with countersunk brass screws. The enclosure is complete with plexiglass windows that are recessed on the inside of each side panel.

Not that I ever would, but the labels on two sides of the ketchup bottle case are there because it just had to be done.
Subscribe to:
Posts (Atom)