In this (not so) brief tutorial, we hope to put that right. The first thing to try was to take an existing PDF and simply rescale it. This worked, except it took a lot of trial and error in re-scaling by degrees until the slots were exactly 3mm wide (we're using M3 bolts for our grippy finger things). But in doing this, we ended up with a chuck that was far too big (in diameter) for what we wanted).
What we needed to do was draw one entirely from scratch: This tutorial uses Inkscape - because it's freely available and is used by lots of people for drawing/preparing vector drawings for laser cutting. Until quite recently, we did all our drawing in Flash, then imported it into Inkscape to save as a .dxf (our laser cutter uses NewlyDraw which likes dxf files for cutting). Inkscape is an ok drawing package in it's own right - so we'll stick with it for this tutorial:
The first thing to do is draw some guidelines. Not just for seeing how things are progressing by eye, but Inkscape automatically uses them for snapping. This is really handy, later on. So start off by clicking on the rulers on the outer edge of the screen and dragging them into the centre. As one guide approaches another, they will try to snap together.

Draw another guideline and release. Place your mouse pointer over the node in the middle of the line and hold down the shift key. The arrow pointer should change to allow you to rotate the guideline. With the shift key held down, also hold down the control (ctrl) key. This constrains the guides to 90, 60, 45 and 30 degrees only. Draw two more guides at 45 degrees and snap them all to a single centre point

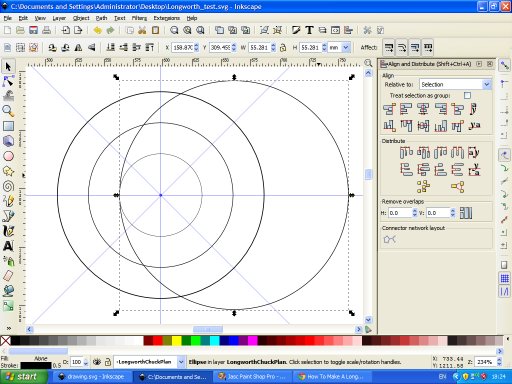
Select the circle tool. Place the mouse pointer over the centre of the guidelines until a snapping guide appears. Hold down the shift key (this forces Inkscape to draw the centre of the circle from the current mouse position, rather than the top left corner) and draw a circle of your chosen size. We drew ours about 50mm across.

Duplicate the newly drawn circle (select it then hit Ctrl+D on the keyboard) and set the size to about 20mm by 20mm. Place the smaller circle inside the larger one and call up the alignment dialogue (hit Ctrl+Shift+A on the keyboard).

Click the icons to align to the centre both vertically and horizontally. Repeat with another circle in between the two. Since we've drawn a 50mm circle and a 20mm circle inside it, the difference between the two diameters is 30mm. So make the third circle 35mm across (20 + half 30 = 20+15 = 35) and centre in the same way.

Now this is where things could get complicated, so pay attention!
We need to draw a circle with the centre-point on the middle circle, and the outer edge on the far side of the smaller circle. As you place your mouse pointer near the middle circle, on the horizontal guidline, Inkscape tries to snap the "handle to guide". This is good. With the circle tool selected, hold down the shift key and draw a circle (shift+circle causes the circle to be drawn with the centre point at the current mouse position)

With the shift key held down, also hold down the control (ctrl) key. This causes the otherwise-ellipse to be constrained to a few set sizes. Drag the mouse diagonally and with the control key pressed, Inkscape should draw a perfect circle.
Repeat this process at all four points where the guidelines intersect the middle circle (both sides of the horizontal and vertical guides). In this example, we've coloured them pale to make them easier to see!

Select a circle and hit the "node select" tool (second from top on the tool bar). Click on one of the round-shaped nodes

Drag the round-shaped node and Inkscape converts the circle into an arc. Shorten the arc so that it travels only from the inner circle to the outer one.

Repeat for all four arcs. These are the lines we'll need to cut out. So all we need to do now is make them the right size. Remove the inner and middle circles - we're done with these now.

With one of the arcs selected, right-click on the stroke dialogue in the bottom left corner of the screen and make sure the units are mm (not pixels)

We're using M3 bolts so we set the stroke width to 3mm.

Repeat this for all four arcs

With all four arcs selected, choose Path -> Stroke to Path

With the four arc shapes selected, edit the stroke and fill colours - set the stroke to black, 0.1mm and set to no fill colour. Now we just need to stop the arcs reaches to the very edges of the outer disk.

Select the outer circle and duplicate (ctrl+D). Modify and scale to about 90% (or make a specific height/width and centre to the outer circle using the alignment dialogue - ctrl+shift+A - as before)
Now select this slightly-smaller circle and copy (to the clipboard, ctrl+C). This will be needed in a minute!

Select one arc, hold the shift key and select the inner circle, so that both are selected. From the Path menu, select intersection.

The inner circle disappears and the selected arc is shortened.

Now from the Edit menu, Paste in Place. This puts the inner circle back to exactly where it was. Select this inner circle, another arc and repeat Path -> Intersection

Repeat this process for all arcs. We're done!

The resulting shape is one side of the Longworth Chuck.
You'll need to cut two of these shapes. Flip one over and place them face to face. Slot the M3 bolts between the gaps and as the two disks rotate against each other, the bolts slide up and down....
Should you require more pegs, you can also repeat this entire process on the diagonal guides, creating an eight-peg chuck (or maybe just duplicate the arcs and rotate through 45 degrees?)


